Friday, November 6, 2015

Medusa Costume 2015

Here I am with my friend Michelle who was dressed as a rock star!

I was freaking people out with my snakes!

But what impressed people the most were these crazy shoes! I got them for $10 and they were purple faux suede. I painted them green with acrylic and added glitter and flat backed crystals. It took many days to do that, but it was worth all the work in the end.

Monday, October 5, 2015

Medusa Makeup Test

I was looking at some tutorials on how to make tear streaked eyes, because Medusa has lost her beauty and her face turns men to stone....so why wouldn't she be crying? I think it turned out alright for a first attempt. I only did half my face....because it was just a test.

Thursday, September 24, 2015

Last Year's Medusa

This was the basic costume last year.....with a sort of toga style dress.

A lot of people liked the wig last year, but this year it's going to be waaaay better. The costume will be basically the same, but with better shoes. I'll photograph them later.

Medusa Wig With MORE Snakes

Here's another test of the wig with more snakes added. If I had the time, I would have removed all the stationary snakes and replaced them all with the movable ones, but I don't have the time this year.

Thursday, September 17, 2015

Wednesday, September 16, 2015

Medusa Wig With Moving Snakes


Just a couple of shots with the moving snakes attached to the old wig. I ended up inserting wires into a few of the old snakes to give them more height and get them out of the way so the moving snakes wouldn't get trapped by them.

Friday, September 4, 2015

Medusa Costume With Moving Snakes


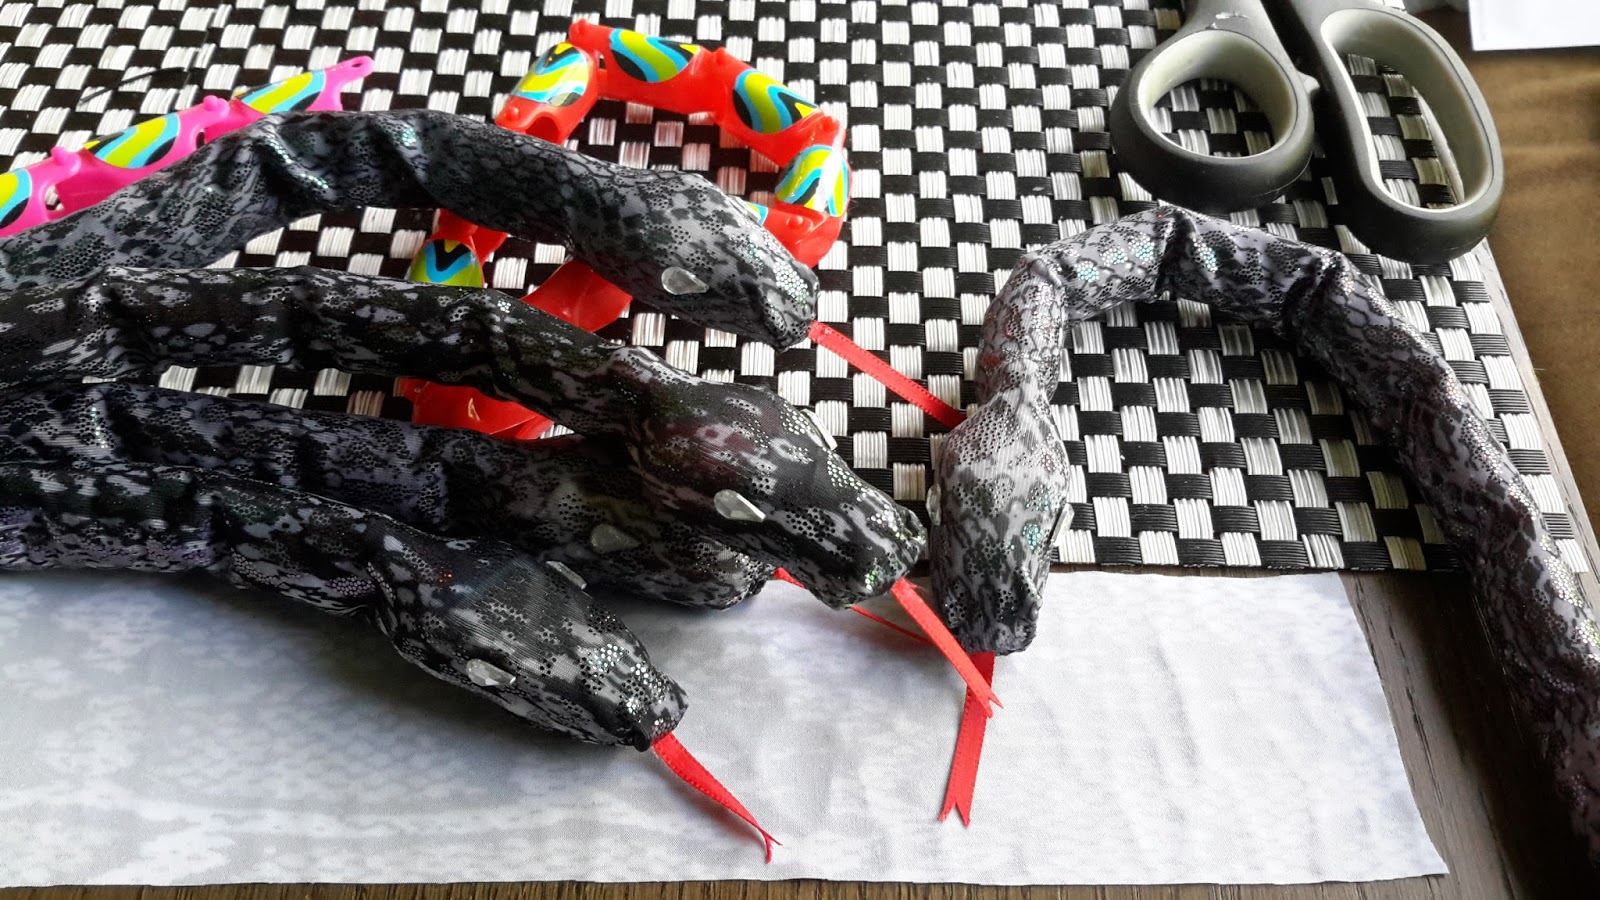
Start with some of these plastic articulated snakes. Take the pointy tail piece off.

Make a sheath out of stretchy, snake-print fabric. Don't make it too tight, or too loose.
I personally like to add some length to the heads by stuffing the mouth with paper towel, then wrapping some masking tape over the snout. Masking tape is easiest to work with because you can shape it.
Sew the end of the fabric sheath around the snout and glue on some eyes and a tongue made from a thin red ribbon with a notch cut out of it. I cut a small slot in the end of the snout to insert the tongue.
Make many of these snakes so you can sew them on to your wig! I will be showing that next step soon.


Friday, October 4, 2013

Inspiration

Originally, I was inspired by this minotaur from "Time Bandits"
I recently discovered there was a similar minotaur in "Gladiator"


There must be something in the consciousness, because after I had finished my costume, I stumbled upon these images of traditional Pagan costumes.


Sunday, September 22, 2013

Minotaur Costume COMPLETE

 There! It's done! I'm just going to wear some dirty face make up and maybe put some battle scars on my arms, but as far as the outfit, it's finished. Adding rubber to the soles of the boots made walking SO much easier!


 Here you can see I made the back of the vest/corset adjustable in case I lose any more weight. The gap in the skirt is caused by the belt buckle in the back (which is what fastens the skirt part together....so it's kinda necessary)

Sunday, September 8, 2013

Rubber Soles

One thing I became painfully aware of when walking in these home-made platform boots was that they were slippery. I had painted the bottoms of the insulation black with acrylic paint, but there was no grip at all...and I thought, "This is how accidents happen!" So I went to the local cheap housewares store and bought a rubber placemat.


 I cut out sole shapes by tracing around the boots.
 I squeezed out some "NO MORE NAILS" adhesive then smeared it evenly and as thinly as I could using a scrap of paper.
I pressed the rubber piece onto the bottom and wiped away the excess adhesive that oozed out. When It's dry, I'll touch up the white adhesive with more black acrylic paint.

Monday, September 2, 2013

Minotaur Costume Almost Complete!

 It needs a few "tweaks" but it's pretty much finished. It's cumbersome to move around in....and I need a second person to help me get into it, but I think it turned out pretty good.


Wednesday, July 24, 2013

Ben Nye T-shirt idea

Anyone, who knows anything about Hallowe'en make-up and/or theatrical make-up would hopefully be able to relate to this T-shirt. I thought of it a while ago, but I just finished painting it today. It's a bit messy. I use a stenciling method and then fill in the gaps.
 It's a one of a kind!

Tuesday, July 23, 2013

Papier Maché Battle Axe

This is the beginning of the papier maché over the cardboard base. For the handle I used an old branch leftover from when we had the half dead apple tree in our backyard chopped down.

Here is the papier maché finished.

I coated it in primer, made by mixing Gesso with black acrylic.

I spray painted it with "chrome" silver Krylon paint....now it looked like it was made of tin foil.

I used watered down black acrylic, to weather the axe. I also stuck in some metal studs meant for leather to look like rivets.

I wrapped some leather strips all around the handle to bulk it up a bit. Now it's finished.

Monday, July 1, 2013

Bottom Half of the Costume

 This is how the bottom half of the Minotaur costume will look. I'm adapting it from the costume  here
And yes....I am in the process of losing weight.

Saturday, June 22, 2013

It's The Little Things

 I made a few more changes later.
 I am in the midst of making fingerless gauntlets, but as this costume is taking on a bit of a Road Warrior-esque look......shiny new gloves would look silly. So after reading a lot about distressing leather, I used some rubbing alcohol and then I used coarse grit sandpaper. The glove on the left looks a lot more authentic now. Remember, beat stuff up, take some sandpaper to the edges....make it dirty! These are the things that can make or break your costume.

Saturday, June 8, 2013

Continuing with Platform Boots

 Here are the boots with the excess fabric trimmed off.
And here is what I'll be wearing over the boots...... black (fake)fur leg-warmers. I still need to do a few little embellishments to the boots.

Sunday, June 2, 2013

Platform Boots Cont.

 I had to wait a while before the adhesive dried before I continued. I also found that to get the fabric to go around the toe better it was necessary to wrap the fabric like these photos. So, although on the one side of the boot the fabric's edge is flush with the bottom of the sole, there's going to be an overhang on the other side that will be trimmed off after the adhesive has fully set.