Friday, October 4, 2013

Inspiration

Originally, I was inspired by this minotaur from "Time Bandits"
I recently discovered there was a similar minotaur in "Gladiator"


There must be something in the consciousness, because after I had finished my costume, I stumbled upon these images of traditional Pagan costumes.


Sunday, September 22, 2013

Minotaur Costume COMPLETE

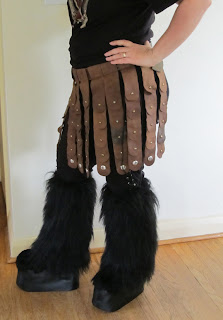
 There! It's done! I'm just going to wear some dirty face make up and maybe put some battle scars on my arms, but as far as the outfit, it's finished. Adding rubber to the soles of the boots made walking SO much easier!


 Here you can see I made the back of the vest/corset adjustable in case I lose any more weight. The gap in the skirt is caused by the belt buckle in the back (which is what fastens the skirt part together....so it's kinda necessary)

Sunday, September 8, 2013

Rubber Soles

One thing I became painfully aware of when walking in these home-made platform boots was that they were slippery. I had painted the bottoms of the insulation black with acrylic paint, but there was no grip at all...and I thought, "This is how accidents happen!" So I went to the local cheap housewares store and bought a rubber placemat.


 I cut out sole shapes by tracing around the boots.
 I squeezed out some "NO MORE NAILS" adhesive then smeared it evenly and as thinly as I could using a scrap of paper.
I pressed the rubber piece onto the bottom and wiped away the excess adhesive that oozed out. When It's dry, I'll touch up the white adhesive with more black acrylic paint.

Monday, September 2, 2013

Minotaur Costume Almost Complete!

 It needs a few "tweaks" but it's pretty much finished. It's cumbersome to move around in....and I need a second person to help me get into it, but I think it turned out pretty good.


Wednesday, July 24, 2013

Ben Nye T-shirt idea

Anyone, who knows anything about Hallowe'en make-up and/or theatrical make-up would hopefully be able to relate to this T-shirt. I thought of it a while ago, but I just finished painting it today. It's a bit messy. I use a stenciling method and then fill in the gaps.
 It's a one of a kind!

Tuesday, July 23, 2013

Papier Maché Battle Axe

This is the beginning of the papier maché over the cardboard base. For the handle I used an old branch leftover from when we had the half dead apple tree in our backyard chopped down.

Here is the papier maché finished.

I coated it in primer, made by mixing Gesso with black acrylic.

I spray painted it with "chrome" silver Krylon paint....now it looked like it was made of tin foil.

I used watered down black acrylic, to weather the axe. I also stuck in some metal studs meant for leather to look like rivets.

I wrapped some leather strips all around the handle to bulk it up a bit. Now it's finished.

Monday, July 1, 2013

Bottom Half of the Costume

 This is how the bottom half of the Minotaur costume will look. I'm adapting it from the costume  here
And yes....I am in the process of losing weight.

Saturday, June 22, 2013

It's The Little Things

 I made a few more changes later.
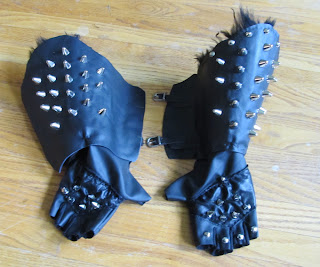
 I am in the midst of making fingerless gauntlets, but as this costume is taking on a bit of a Road Warrior-esque look......shiny new gloves would look silly. So after reading a lot about distressing leather, I used some rubbing alcohol and then I used coarse grit sandpaper. The glove on the left looks a lot more authentic now. Remember, beat stuff up, take some sandpaper to the edges....make it dirty! These are the things that can make or break your costume.

Saturday, June 8, 2013

Continuing with Platform Boots

 Here are the boots with the excess fabric trimmed off.
And here is what I'll be wearing over the boots...... black (fake)fur leg-warmers. I still need to do a few little embellishments to the boots.

Sunday, June 2, 2013

Platform Boots Cont.

 I had to wait a while before the adhesive dried before I continued. I also found that to get the fabric to go around the toe better it was necessary to wrap the fabric like these photos. So, although on the one side of the boot the fabric's edge is flush with the bottom of the sole, there's going to be an overhang on the other side that will be trimmed off after the adhesive has fully set.


More on How To Make Platform Boots

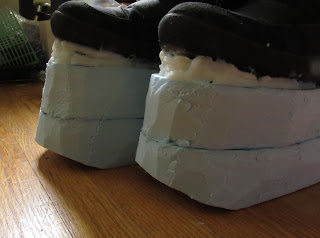
 Here are the boots with their styrofoam insulation soles firmly attached with "NO MORE NAILS" construction adhesive ....and I've filled in gaps with the stuff as well and allowed it to dry fully....over 24 hours. I was then able to carve away all the excess styrofoam to shape the soles a little neater.


 Remember you MUST cut a wedge out of the soles at the toes where the meet the floor or you won't be able to walk without the soles tearing off! You have to be able to roll your foot forward when you take a step! Try them on and you'll see. No more than and two inches or so need to be trimmed back.
 Then I got some black vinyl upholstery fabric and cut a strip long enough to wrap around the entire sole from heel to toe. Make sure you leave some overlap which can be trimmed off later. Try to match the fabric with the bottom of the sole, but leave extra at the top which will be trimmed also. Once again I used "NO MORE NAILS" to attach the fabric to the styrofoam.

Sunday, February 17, 2013

Making Platform Boots


 My cat is investigating the styrofoam insulation I'm using to build up the platform soles.

I ended up only using 2 layers because they were high enough for what I'm doing. I used "NO MORE NAILS" brand adhesive to stick the layers together and to the soles of my old winter boots. I'll be smoothing and blending the layers together. NOTE: It's very important to cut the front of the platform sole to the same angle of the sole of the original boot, otherwise you won't be able to walk properly and you risk the fake sole coming off.
  More photos as work progresses.